Use various functions like making a table, drawing a table, joining/splitting tables/cell properties and cells, to easily make and edit tables.
Create Table |
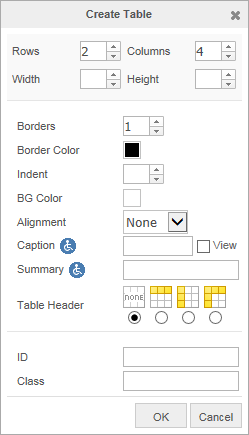
Create a table by adjusting its properties such as the number of columns and rows, the size, the type of borders, etc.
Rows
Sets the number of horizontal rows in the table.
Columns
Sets the number of vertical columns in the table.
Width/Height
Sets the size of the table. The size of the table is set in terms of pixels. To create a table with a fixed size, you must set an absolute size in terms of pixels.
Borders
Sets the thickness of the table's borders. The default value is '1' and this can be increased for thicker borders.
Border Color
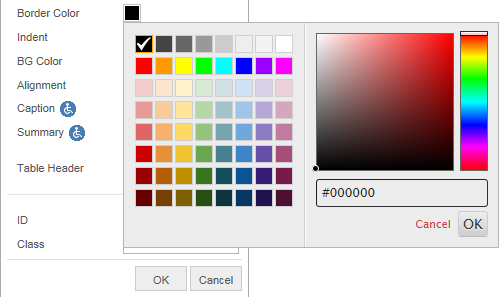
Sets the color of the borders. Click on the colored square and then choose a color from the palette which appears.
Hexadecimal color codes refer to representing colors by using hexadecimal (0~F) to represent 6 numbers. For example, 'FFFFFF' means white color, and '0000FF' means blue.
The color spectrum shows various colors equivalent to the hexadecimal color codes entered in the hexadecimal box by varying the red, green, blue, saturation and brightness values. When the mouse is positioned on the color spectrum, the mouse pointer is changed to a cross. Use the mouse to select the desired color and the hexadecimal color code will be displayed.
Indent
Sets the indentation of the table.
BG Color
Sets the background color of the table. Click on the colored square and then choose a color from the palette which appears.
Alignment
Sets how the table content will be aligned. Choose from one of these options: 'none', 'right', 'center' and 'left'.
Caption
Sets the table's caption. The caption is shown at the top of the table.
Captions allow the user to easily differentiate tables when a page has multiple tables.
If you check the View checkbox, the caption is shown in the editing window and in preview mode. If you do not check the box, the caption is only entered in the HTML source code.
If the Administrator sets the Accessibility options to Level 1 or Level 2, the table is required to have a caption.
Summary
Adds a summary attribute to the table.
The content entered as the summary does not appear in the CrossEditor editing window or in preview mode. It is only inserted in the HTML source code. It is used to provide a summary of the table to users who cannot view the table.
If the Administrator sets the Accessibility options to Level 1 or Level 2, the user must enter text in the Summary field.
Table Header
Select which rows or columns will be used as the table header.
id, class
Specify the ID and class value for the table to be inserted.
Draw Table |
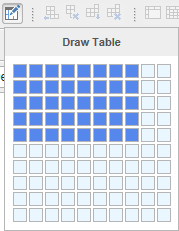
This tool allows you to quickly select the number of rows and columns in a table.
Click the (Draw Table) button and move the mouse over the panel that appears to set the number of rows and columns. Click the panel to insert the table.
If the Administrator sets the Accessibility options to Level 1 or higher, the Draw Table button is disabled.
Add Row |
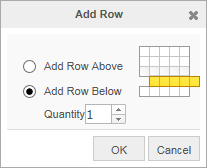
This command inserts one or more rows into a table. You can insert rows above or below the row where the cursor is placed.
Add Row Above/Add Row Below
To add a row above the row where the cursor is located, click . To add a row below the row where the cursor is located, click .
Quantity
Sets the number of rows to be added. Click the arrow buttons to select a value or enter it directly.
Delete Row |
Click on a row in a table to select it, then click this button to delete the row from the table.
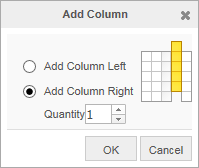
Add Column |
This command inserts one or more rows into a table. You can insert rows to the left or to the right of the column where the cursor is placed.
Add Column Left/Add Column Right
To add a column to the left of where the cursor is located, click . To add a column to the right of where the cursor is located, click .
Quantity
Sets the number of columns to be added.
Delete Column |
Click on a column in a table to select it, then click this button to delete the column from the table.
Merge Cells |
Merges several cells into a single cell.
Click and drag the mouse across the cells that you want to merge to select them, then click this button. The single cell which is created will have the same total width and height as the merged cells.
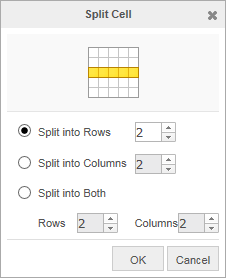
Split Cell |
Splits a single cell into several cells.
Click on a cell to select it, then click this button. In the panel that appears, choose whether to split the cell horizontally, vertically, or in both directions, as well as the number of resulting cells to be created.
Split into Rows
Split the cell horizontally into rows. Enter the number of rows to create.
Split into Columns
Split the cell vertically into columns. Enter the number of columns to create.
Split into Both
Split the cell into both rows and columns. Enter the number of and the number of to create.
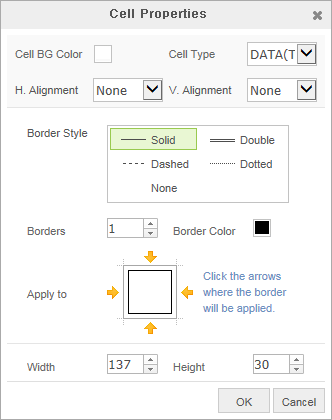
Cell Properties |
Sets the properties of a cell, including its size, background color, etc.
Cell BG Color
Click the color swatch to open the color palette and select the cell background color.
Cell Type
Select the cell type. You can choose between data (using the <td> tag) or header (using the <th> tag).
Border Style
Sets the style of line to border the cell with. You can select from Solid, Double, Dashed and Dotted.
If you choose Double as the border style, the cell border thickness is set to 3 so that the border can appear as a double line on the screen.
Borders
Sets the thickness of the cell border. The default value is 1 and can be increased for a thicker border.
Border Color
Sets the color of the cell border. Click on the colored box and select a color from the palette that appears.
Apply to
Selects the borders to which the modified cell properties will apply. Click to apply the modifications.
Width, Height
Specify the width and height of the cell.
Adjust the size |
Make the height and width of a table's cells uniform.
Equal width for all rows
Make the width of the selected rows the same. Use this function only when selecting one or more continuous cells in the column direction or the entire table.
Equal height for all columns
Make the height of the selected rows the same. Use this function only when selecting one or more continuous cells in the row direction or the entire table.
Equal width/height
Make the width and height of the selected cells the same. Use this function only when selecting one or more continuous cells or the entire table.
Convert the table to text |
Change the contents of the table to character strings. The contents of each cell will be changed to a paragraph.
When a table with 2 rows and 3 columns is changed to character strings, the character string in each cell will be listed.
