This document provides how to manage test cases in a test plan.
To manage test plans, you need a permission such as Project Manager, Create Plan/TC … . For more information, please refer to Global Permissions.
When you create a test case in a test plan, if the test plan type is Auto/Manual, the test test case type is automatically set to Auto/Manual.
Test case type
Manual : enter texts
Auto : enter python scripts (only professional edition)
Create Test Case
To create test cases in a test plan:
In TESTaide home, select a project that you want to create test cases.
Select the 'Test Plans' menu on the left sidebar.
In the test plan page, select a test plan from the list you want to create test cases.
In the test plan detail page, click the ‘More’ button on the bottom right. When a pop-up menu appears, select ‘Create Test Case’.
In the test case creation page, enter the following information
Category : Choose a predefined category of test case
Test Case Name* : The maximum length is 50 characters.
Test Case type : Fixed by type of test plan
Priority
Requirement : Requirements defined in Jira (multiple inputs possible)
Tags : You can search for test cases at the top Tag Search with that tag. (multiple inputs possible)
Pre-Condition : Precondition for testing
Attachments
If you click the 'Test Case Save' button on the top right, you will see the test step/script pop-up.
Create a test case by referring to the link below according to the test case type.
Manual : Create Test Step
Auto : Create Test Script
If you want to create more than one test step/script, click the ‘Step Create’ button on the right side of the test step/script panel at the bottom to create it.
Add Test Case
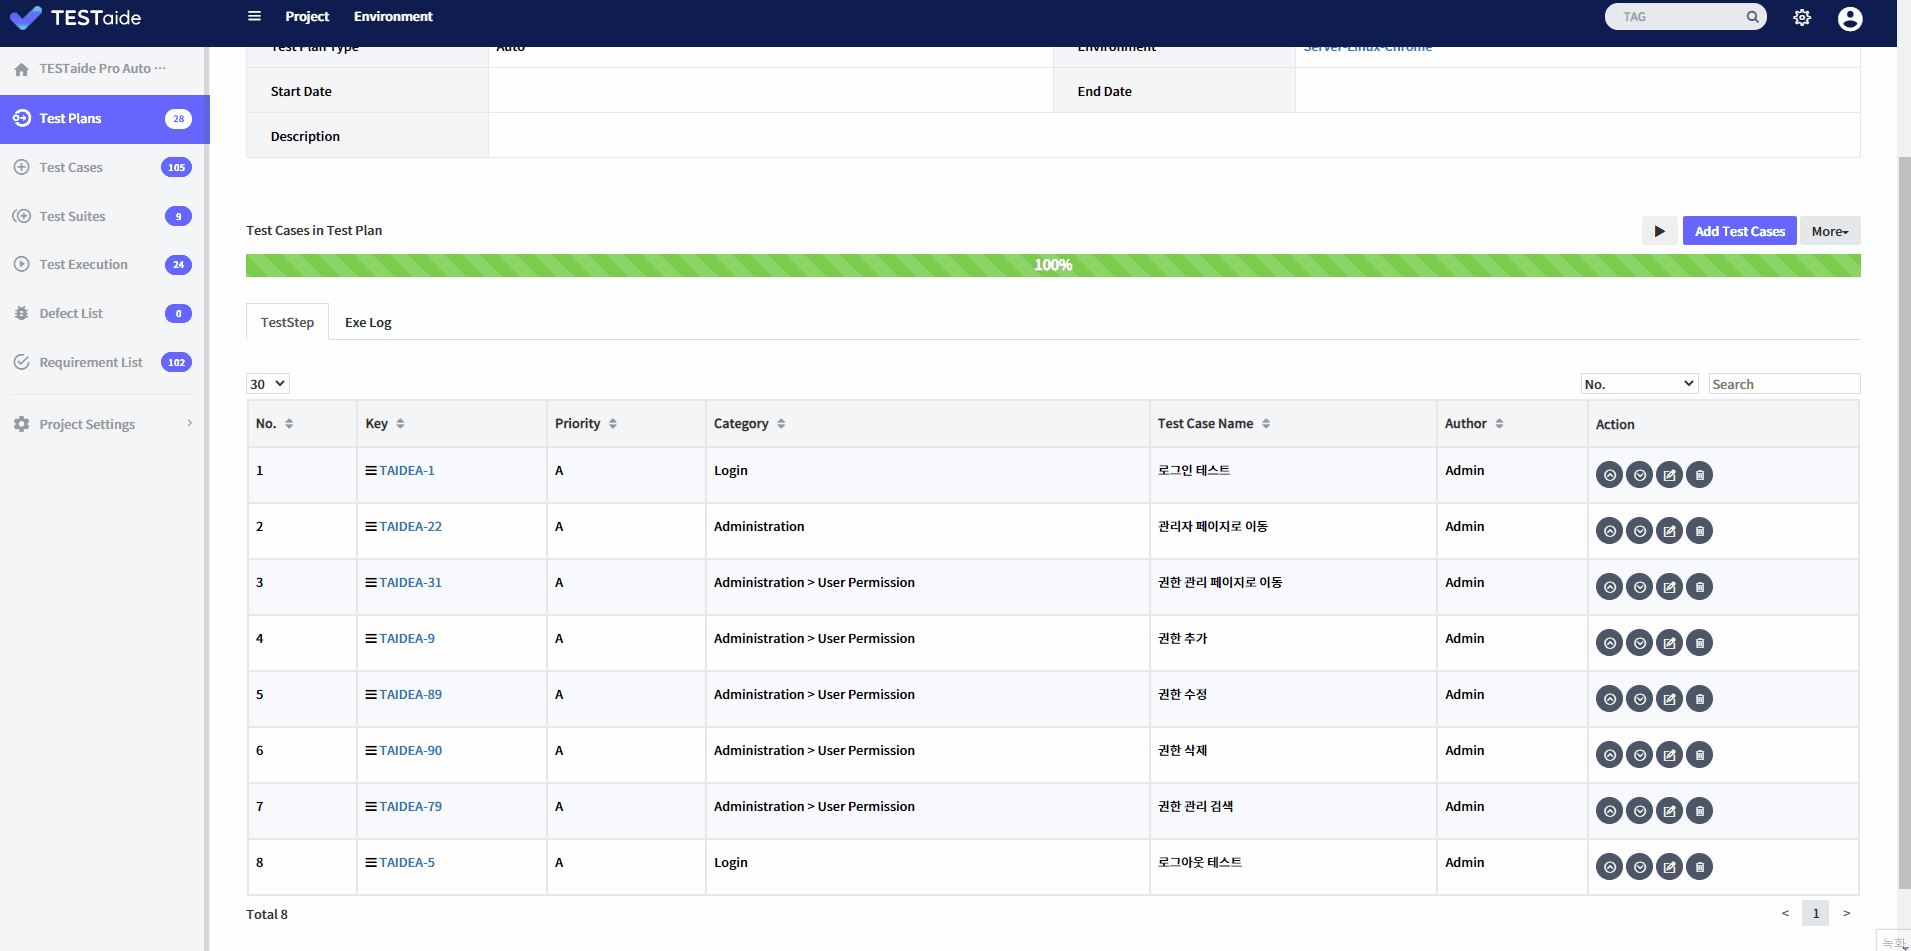
To add test cases in a test plan:
In TESTaide home, select a project that you want to add test cases.
Select the 'Test Plans' menu on the left sidebar.
In the test plan page, select a test plan from the list you want to add test cases.
In the test plan detail page, click the ‘Add Test Cases’ button on the bottom right.
In the ‘Add Test Cases’ pop-up window, select test cases to add from the list.(Test cases already registered in the plan are not be exposed)
Click the ‘Add Test Cases’ button at the bottom to complete adding test cases.
Add Test Case In Test Suite
To add test cases which are in a test suite:
In TESTaide home, select a project that you want to add test cases.
Select the 'Test Plans' menu on the left sidebar.
In the test plan page, select a test plan from the list you want to add test cases.
In the test plan detail page, click the ‘More’ button on the bottom right. When a pop-up menu appears, select ‘Add Test Cases in Test Suite’.
In the ‘Test Suites’ pop-up window, select a test suite with test cases you want to add.
In the ‘Add Test Cases’ pop-up window, select test cases to add from the list.
Click the ‘Add Test Cases’ button at the bottom to complete adding test cases.
Delete Test Case
To remove test cases in a test plan:
In TESTaide home, select a project that you want to remove test cases.
Select the 'Test Plans' menu on the left sidebar.
In the test plan page, select a test plan from the list you want to remove test cases.
In the test plan detail page, click the ‘Remove’ icon besides the test case you want to delete from the list.
When the deletion confirmation pop-up window appears, click the 'OK' button to complete the deletion.
Delete All Test Cases
To remove all test cases in a test plan:
In TESTaide home, select a project that you want to remove all test cases.
Select the ‘Test Plans’ menu on the left sidebar.
In the test plan page, select a test plan from the list you want to remove all test cases.
In the test plan detail page, click the ‘More’ button on the bottom right. When a pop-up menu appears, select ‘Delete All Test Cases’.
When the deletion confirmation pop-up window appears, click the ‘OK’ button to complete the deletion.
Drag&Drop Test Cases
To change the order of test cases in a test plan:
Click ‘NO.’ of the test case you want to change the order of.
Drag and Drop it to the desired location.
Check the changed order.
Pre-Test Test Scripts
To pre-test test scripts before executing test:
In TESTaide home, select a project that you want to test scripts .
Select the 'Test Plans' menu on the left sidebar.
In the test cases in test plan panel, click the ‘▶’ button.
When the select environment pop-up window appears, select environment then click the ‘Run' button.
In the Exe Log tab, you can check the test results. (If the python script is entered incorrectly, you will get an error.)