This document provides an example on how to get started with the TESTaide application purchased from the Azure Marketplace. You do not have to follow this guide, it is only meant to provide basic instructions for the main features of TESTaide to help you get started using our solution.
...
Select the Test Case option from the left sidebar and click the Create Test Case button.
On the test case creation page, enter the required, and any optional, fields and click the Test Case Save button.
Again, make sure to select the test case type as Auto!
On the ‘Test Script’ pop-up window, write the test script and click the Save button.
You can also provide a name for the script, test data, and expected results.
Any information written in the test data box can be used as a variable in the script and the expected result box is meant to assert your test case, and is executed after the main test script has finished.
Test Script Example (Login to TESTaide in localhost)
코드 블럭 language py self.driver.get("http://localhost:8080/loginForm.do") my_driver = self.driver userIdEle = my_driver.find_element(By.NAME, 'logId') passwordEle = my_driver.find_element(By.NAME, 'logPw') submitEle = my_driver.find_element(By.CLASS_NAME, "btn-style") userIdEle.send_keys(user_id) passwordEle.send_keys(user_pw) submitEle.click() time.sleep(1)Test Data Example
코드 블럭 user_id='user10' user_pw='password_user10'
Expected Result Example
코드 블럭 language py self.assertIn("project.", my_driver.current_url)
TESTaide login test case example
코드 블럭 language py # -*- coding: utf-8 -*- import unittest import time import datetime import random import sys from selenium import webdriver from selenium.webdriver.common.by import By from selenium.webdriver.support.select import Select from selenium.webdriver.remote.command import Command from selenium.webdriver.common.keys import Keys from ServerDriverInfo_0 import ServerDriver_0 class Server_1_TAIDEA_1(unittest.TestCase): @classmethod def setUpClass(cls): cls.driver = ServerDriver_0.instance().getDriver() def test_1_Script_Server_1_TAIDEA_1(self): user_id='testaide' user_pw='welcome' self.driver.get("http://localhost:8080/loginForm.do") my_driver = self.driver userIdEle = my_driver.find_element(By.NAME, 'logId') passwordEle = my_driver.find_element(By.NAME, 'logPw') submitEle = my_driver.find_element(By.CLASS_NAME, "btn-style") userIdEle.send_keys(user_id) passwordEle.send_keys(user_pw) submitEle.click() time.sleep(1) self.assertIn("project.", my_driver.current_url)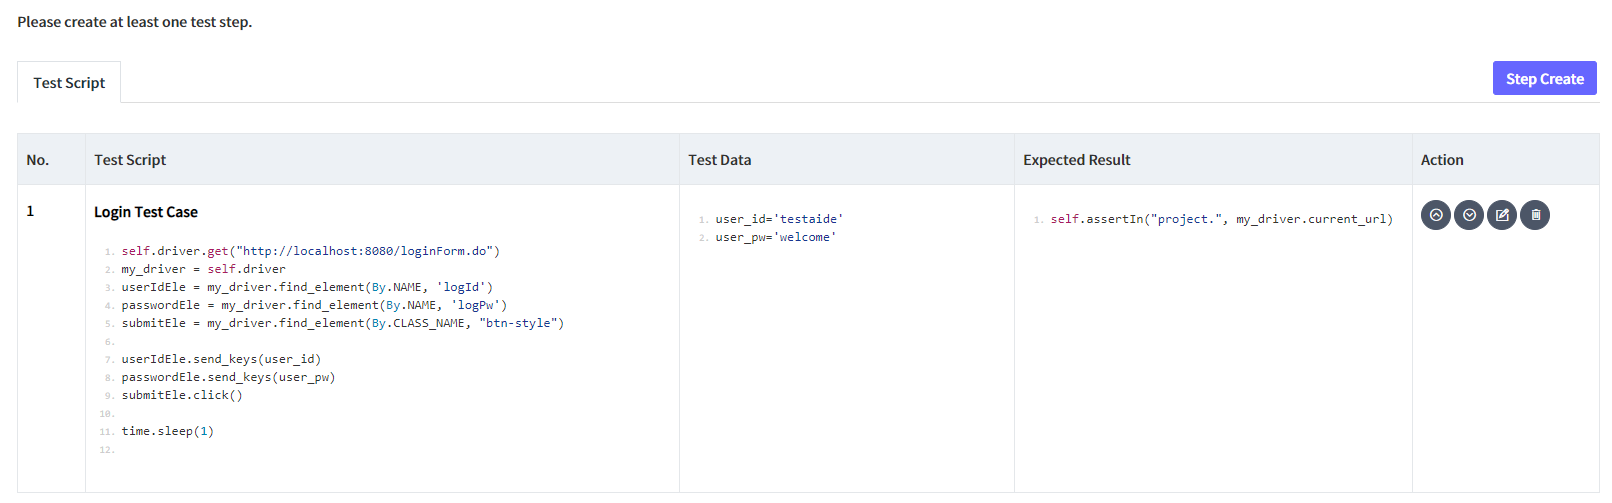
✅ Step 7 – Add Test Case In Test Plan and Test
...
Select the test execution menu in the side bar and select the test plan created in step5.
Click the Add Regression button.
Enter the Regression Title* and click the Save button.
...
✅ Step 10 – Test Execution
...