This document provides how to start TESTaide simplyThis document provides an example on how to get started with the TESTaide application purchased from the Azure Marketplace. You do not have to follow this guide, it is only meant to provide basic instructions for the main features of TESTaide to help you get started using our solution.
| 목차 | ||||
|---|---|---|---|---|
|
✅
...
License Request : https://testaide.io/
Prerequisites
Follow the guide on how to create your own TESTaide Virtual Machine using the Azure Portal & how to start the TESTaide application.
✅ Step 1 – Setup up the database configuration
Once you have started the TESTaide application, go to the application webpage, this would either be on the localhost:<port> or any other URL that has been setup for the virtual machine. The application will make you choose your preferred method for configuring the database.
There are two methods for the database configuration:
The pre-installed PostgreSQL database
Another database that has been configured externally.
Refer to /wiki/spaces/TESTAIDE/pages/
...
✅ Step1. Login as a System Admin
ID : testaide
Password : welcome
✅ Step2. Enter the license key
Enter the license key you provided. (If you don’t enter the license key, you can’t use TESTaide)
...
✅ Step3. Add Test Environment
...
1134887099 on configuring a database externally for TESTaide usage.
After you have finished the configuration, the application will restart so please wait one moment. It might take up to 1 minute to fully restart.
| 참고사항 |
|---|
On the first start and initialization of the TESTaide application, it is highly recommended to restart the virtual machine to make sure that all database and Infrastructure Agent connections are properly made as intended. Simply restart the machine in the Azure portal & run the start command when the virtual machine has restarted to continue using the TESTaide application. |
Step 2 – Create a system administration user
After having set up the database, it is time to create a system administration user. Simply enter the desired ID & password, press the ‘Next’ button, and proceed with logging in.
✅ Step 3 – Add a Test Environment
We will be creating a Server-type environment for this guide, the server environment execute automated test cases locally on the host-machine.
From the navigation header, click the Environment option and click the Create Environment button.
Select the
...
environment type as Server
...
and enter the required, and any optional, fields and click the Save button.
Type* : Server
Platform*
Browser*
Browser Path*
Windows : C:/Program Files/Google/Chrome/Application/chrome.exe
Linux : /opt/google/chrome/chrome
Driver File Path*
Environment Name*
...
✅
...
Step 4 – Create Project
The next step is to create the project that we want to create test cases for.
From the navigation header, click the Project
...
and click the Create Project button.
Enter the required, and any optional, fields and click the Save button.
...
Project Type*
...
Project Key*
...
Project Name*
For the environment field, select the name of the environment you created in
...
step 3.
...
When you have been redirected to the homepage again, from the list of projects, click the project you created.
...
✅
...
Step 5 – Create Test Plan
...
We will first create the test plan that we want to add our test cases for. The test plan can be placed in the ‘Testing’ phase which can then execute iterations of the plan with results provided for efficient management.
Select the Test Plan option from the left sidebar and click the Create Test Plan button.
...
✅ Step6. Create Test Case
...
Enter the required, and any optional, fields and click the Save button.
Environment*
Test Plan Type* : Auto
Test Plan Name*
As we want to make test cases for a server, which automatically executed the tests, select the ‘Auto’ test plan type.
For the environment field, select the name of the environment you created in step 3.
...
✅ Step 6 – Create Test Case
In this example, we will create a simple test case that logs in to the TESTaide web application with a provided username & password, and asserts that we have successfully logged in by reading the URL on the redirected page.
Select the Test Case option from the left sidebar and click the Create Test Case button.
...
On the test case creation page, enter the
...
required, and any optional, fields and click the Test Case Save button.
...
Again, make sure to select the test case type as Auto!
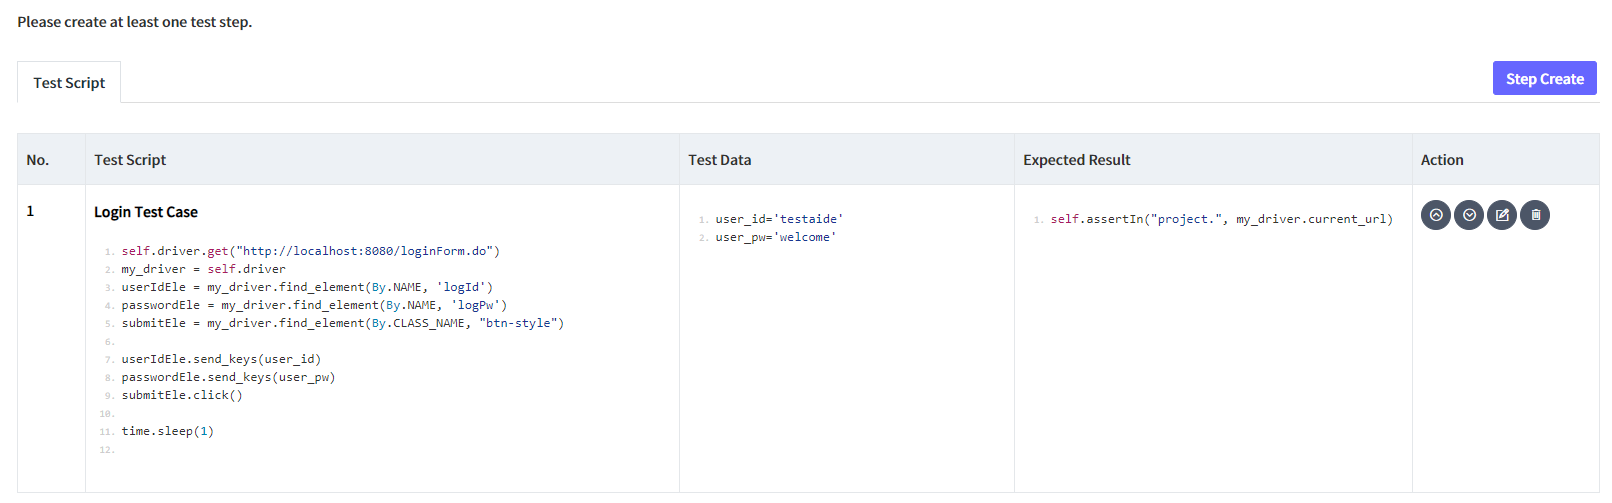
On the ‘Test Script’ pop-up window,
...
write the test script and click the Save button.
...
Scripts must be described in accordance with Python syntax, and method names for each test case are not written.
You can also provide a name for the script, test data, and expected results.
Any information written in the test data box can be used as a variable in the script and the expected result box is meant to assert your test case, and is executed after the main test script has finished.
Test Script Example (Login to TESTaide in localhost)
코드 블럭 language py self.driver.get("http://localhost:8080/loginForm.do") my_driver = self.driver userIdEle = my_driver.find_element(By.NAME, 'logId') passwordEle = my_driver.find_element(By.NAME, 'logPw') submitEle = my_driver.find_element(By.CLASS_NAME, "btn-style") userIdEle.send_keys(user_id) passwordEle.send_keys(user_pw) submitEle.click() time.sleep(1)Test Data Example
코드 블럭 user_id='
...
user10'
user_pw='
...
password_user10'
Expected Result Example
코드 블럭 language py self.assertIn("project.", my_driver.current_url)
TESTaide login test case example
...
The python script that is completed when executing the test
코드 블럭 language py # -*- coding: utf-8 -*- import unittest import time import datetime import random import sys from selenium import webdriver from selenium.webdriver.common.by import By from selenium.webdriver.support.select import Select from selenium.webdriver.remote.command import Command from selenium.webdriver.common.keys import Keys from ServerDriverInfo_0 import ServerDriver_0 class Server_1_TAIDEA_1(unittest.TestCase): @classmethod def setUpClass(cls): cls.driver = ServerDriver_0.instance().getDriver() def test_1_Script_Server_1_TAIDEA_1(self): user_id='testaide' user_pw='welcome' self.driver.get("http://localhost:8080/loginForm.do") my_driver = self.driver userIdEle = my_driver.find_element(By.NAME, 'logId') passwordEle = my_driver.find_element(By.NAME, 'logPw') submitEle = my_driver.find_element(By.CLASS_NAME, "btn-style") userIdEle.send_keys(user_id) passwordEle.send_keys(user_pw) submitEle.click() time.sleep(1) self.assertIn("project.", my_driver.current_url)
...
✅ Step 7 – Add Test Case In Test Plan and Test
Select the test plan menu in the side bar and select the test plan created in step5.
In the test plan detail page, click the Add Test Cases button on the bottom right.
Select the test case created in step6 and click the Add Test Case button.
Click the ▶ button to the right of the Add Test Case button. (Check the test case for errors before executing the test.)
Select the test environment and click the Run button.
Check the Exe Log tab. (If the python script is entered incorrectly, you will get an error.)
...
✅
...
Step 8 – Change the status of test plan from Draft to Testing
In the test plan detail page, click the More>Testing.
...
✅
...
Step 9 – Add Regression
Select the test execution menu in the side bar and select the test plan created in step5.
Click the Add Regression button.
Enter the Regression Title* and click the Save button.
...
✅
...
Step 10 – Test Execution
Click the Run button.
✅
...
Step 11 – View Result
You can see the progress of the test with the progress bar.
On the TestStep tab, you can see the list of test cases being tested and the test results.
On the Exe Log tab, you can see the log running the python script.
...
✅
...
Step 12 – View
Click the project home menu.
You can see the test status in a graph at a glance.
...